NOTE: Due to an error, only a single paragraph was sent by email from the first post in this series. I apologize for any inconvenience caused and hope it will work better this time.
Continuing from our last post, let’s have a brief look at the data and the language we are going to work with and set things up. Remember, the code is available on GitHub.
The language
I have created a very small language for this tutorial, called game.core. It consists of a single concept named
Location, representing a location in a game:
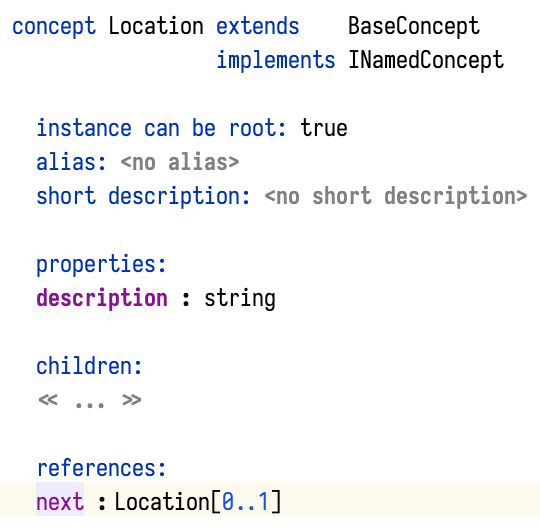
In text-based adventures each location is connected to other locations, for example via compass directions (north, east,
south, west). To keep things simple but still interesting in our case, each location has just one optional next
reference pointing to the next location in the adventure.
Each location also has a name (inherited from INamedConcept) and a description. A location is uniquely identified
by its name. The description field holds additional information about the location.
The input
We will be importing JSON data such as this file (available in the GitHub repository as
input/adventure.json:
{
    "locations": [
        {
            "name": "Street",
            "description": "You stand in front of an old house that looks just like you remembered it in the past. The entrance door is ajar.",
            "next": "House Entrance"
        },
        {
            "name": "House Entrance",
            "description": "You enter the house. Everything here is covered with dust: the floor, the hanger, the shelves. Except for one dust-free door with a label on it that says \"Cellar\".",
            "next": "Cellar"
        },
        {
            "name": "Cellar",
            "description": "The cellar is dark and you can't see anything. Your right hand rests on the wall and senses a light switch."
        }
    ]
}
Note that a location refers to its next location by its (unique) name. Also note that we can refer to locations that appear later in the file (i.e. the importer must support forward references).
Gson
To parse JSON data we will use the Gson library from Google. To do that we will need to add the Gson JAR to our project. The process of doing so is well documented elsewhere and I will not cover it here. In the linked project
Now we can test our parser from the MPS Console:
> {
    JsonElement element;
    try (Reader reader = Files.newBufferedReader(Path.of("/path/to/sample-importer/input/adventure.json"))) {
      element = JsonParser.parseReader(reader);
    }
    #print element;
  }
  // output:
  // {"locations":[{"name":"Street","description":"You stand in front of an old house ...
Since it can be a bit difficult for newcomers to MPS to figure out how to type things properly, here is a screencast of me typing this code into MPS Console and running it:
Where to put the code
The code of the importer will live in a Java class but where do we put the class? We have several options, ordered by the amount of effort required:
- Put the class in one of the existing aspects of the
game.corelanguage. - Create a separate model in the
game.coreand put the class there. Such a model would be called “utility model” in MPS parlance. - Create a separate solution for the importer logic, create a model there and put the class into it.
We don’t need to agonize too much about the decision because we can always move classes between models and modules.
Since none of the existing language aspects feel appropriate, we create a new model, name it game.core.importer, and
a new class ImporterLogic inside:

Initial code
We are now finally ready to write some code! Since our input data contains forward references, we store all nodes in a hash map, keyed by their names. If we encounter a reference to a node we haven’t seen yet, we create it but only initialize its name. Later when we encounter the full data for the target location, we take the previously created node from the map and fill it in.
Here is the full code:
public class ImportLogic {

  public static void importData(string sourceFile, model targetModel) throws IOException {
    final JsonElement element;

    try (Reader reader = Files.newBufferedReader(Path.of(sourceFile))) {
      element = JsonParser.parseReader(reader);
    }

    JsonArray locationsArray = element.getAsJsonObject().get("locations").getAsJsonArray();

    // Store locations in a map to resolve forward references
    Map<string, node<Location>> locationsByName = new HashMap<string, node<Location>>();

    foreach locationElement in locationsArray {
      JsonObject locationObject = locationElement.getAsJsonObject();

      string name = locationObject.get("name").getAsString();
      string description = locationObject.get("description").getAsString();
      JsonElement nextElement = locationObject.get("next");
      string nextName = nextElement == null ? null : nextElement.getAsString();

      node<Location> location = locationsByName.computeIfAbsent(name, {string name => <Location(name: name)>; });

      node<Location> nextLocation = nextName == null ? null : locationsByName.computeIfAbsent(nextName, {string name => <Location(name: name)>; });

      location.description = description;
      location.next = nextLocation;

      targetModel.add root(location);
    }
  }
}
Running the importer
We don’t have any user-friendly way to run the importer yet (I will cover it in a later post) but we can already run it
from the MPS Console. Before we do that we need to create a target model for the imported nodes. Let’s put it into the
game.sandbox solution and name it game.sandbox.imported. Next, we can invoke the importer from the console as
follows:

The console shows an error because we don’t catch IOException but the code will compile and run. As a result, you should
see the three locations created in the game.sandbox.imported model.
Note that since the code in ImportLogic#importData() manipulates the target model, it must run in the context of a
command. MPS Console
establishes a command for us automatically, in other cases we may need to start a command manually.
In the next post we will look at invoking the importer in a user-friendly way. Until then, I would be happy to get any feedback and questions you have.